Search This Blog

Saturday 23 July 2016

Red Helvetia Free Arm Sewing Machine

So my holiday has been slightly more busy and slightly less productive than expected.  However, I have managed to sort out my images of cleaning the red Helvetia into something postable, so here goes....!
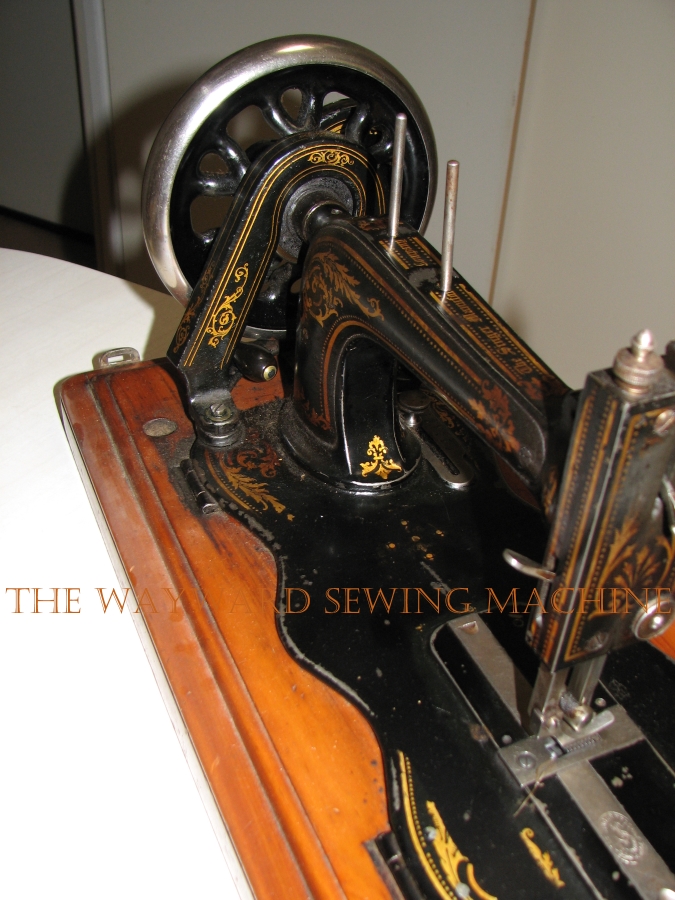
This is how it looked when I brought it home

Stitch length lever
I paid $50 for it, which to be honest was probably a bit much as it is fairly scratched in places.  However, it did come with a box of accessories and its flatbed attachment so it probably wasn't too bad.  One of the most challenging things about it is that everything is done up with screws that require an Allen key to remove.  Fortunately there was one in the box of accessories which I used throughout.  The machine is an end loading oscillating hook, only capable of straight stitch both forward and reverse and the feed dogs drop.
Accessories box

Firstly I wanted to take the motor off it, so that I could clean behind it and so that I didn't have to worry about accidentally leaning the machine on it while I was working on it.  These machines have a light under the faceplate which is wired to the motor, so you have to undo the wiring to get the motor off, as shown below.
Back of machine
Remove the bottom piece of plastic that is pointed to by the green arrow in the picture above.  It goes without saying (I hope!) that you make sure the machine is unplugged first!  It is held in place by one or two screws, I can't remember now and I don't seem to have an appropriate picture.  You should then have something that looks like the image below.  In the picture below I have unscrewed the two large screws holding the motor bracket on so that I can move the motor about and take it off as soon as the wiring is out.

Wiring at base of motor
In the picture above, the two green arrows that are essentially pointing at each other are showing the wiring to the light.  The other two arrows are pointing to where these wires are wired in and the screws that hold them.  Once you loosen the screws you can gently pull the light wires out and lift the motor away.  The light wires stay protruding from the back of the machine as shown below.  Make sure you label which wire goes where into the base of the motor.

Showing light wires
I then set about removing the wooden base from the machine.  To do that, remove the three screws circled in green in the image below.
Showing base screws

Underneath base
You can now turn your machine over and oil anything that moves under there and grease any cams.
Next you can remove the cover on the free arm and the face plate, both are held down with a couple of screws and unfortunately I have a photo of the removal of neither.  The faceplate cannot be lifted right off due to the wiring of the light, as seen below.  You can also remove the back cover which is held in place by the same screw that hold the thread spool holder in place.

Under back cover, oil the LH rod where it sits over the crank and grease the cam & slider on the RH rod

Oil all the oil points and lift the feed dogs up and lightly grease where they slide against another piece of metal.

Oil the oil points on the take-up lever etc and lightly grease the needle and presser bar.
You can now get stuck into dismantling the bobbin area.  One you have the bobbin case out you can remove the piece that holds it all together.  Unfortunately I cannot remember how I did this but will update when I can.  Basically, you remove this piece:
Holds everything together.  Can remove metal spring as indicated for cleaning purposes
Now we have something as below, the hook (the crescent shaped metal piece) will now drop out and we can remove all the screws circled in green.  Incidentally, you can see a piece of thread caught up in mine.
Thread catch

Screws to remove
It will look like this and you can clean it to your heart's desire!
Bobbin area
My hook had a few dints from being struck with the needle but nothing too serious.
Hook strikes
One it's all clean you can re-assemble.

Reassembled
 Finally I took the tension assembly apart and cleaned it well.  You just unscrew the knob and it will all drop to pieces in your hand, very simple.
Tension assembly

Tension pieces in order of reassembly, left to right.

 So that's it, probably not one of my better guides to taking something apart but hopefully followable if you're desperate!  I guess I shouldn't leave it 6 months between taking them apart and writing them up!

Sunday 12 June 2016

Frister and Rossmann Transverse Sewing Machine

One of the machines I have recently acquired is a Frister and Rossmann transverse shuttle machine.  It so happened I was talking to two very nice people about sewing machines and they offered me the machine they had never been sure what to do with.  How could I say no?

At this stage I didn't know what make the machine was although I was assured it was German, which covered a number of possibilities.  I then received an email telling me it was a Frister and Rossmann with a 'horizontal' shuttle, which was a particularly useful piece of information and made me very excited to get my hands on it.  Unfortunately its owners were about to go away for a few weeks to Ceduna so I had to bide my time.

I was not disappointed.  It is a lovely machine, although it shows signs of wear and comes with its shuttle and a whole host of feet, the whole thing being carefully ensconced in a coffin top box.  Just goes to show, sometimes sewing machines really are appropriate dinner-time conversation, for me at least!  In another two weeks I get a three week holiday and I am really hoping to work on  number of machines, including this F&R, the Singer 12, the Borletti 1102 and another new purchase that shall remain unnamed for now.


The F&R from the front

End on, apologies for bad phone pictures.

The pillar with badge

Finally on a completely different tack, I was sewing a skirt for my mother a few months ago using the Helvetia (another machine I really need to get around to posting about) and was really struck with the colour combination as shown below.  I love the colour of this machine, when I discovered they were made in this colour I knew I had to have one.

Sewing a skirt on the Helvetia

Kitchen Towels

I have been far too busy to do anything remotely interesting recently, although I do have some lovely new machines to post pictures of.

However, I had to make some simple kitchen towels for a birthday present and, probably because I was in a hurry, they took four times as long as usual and every machine I touched threw a tantrum.  Needless to say, frustration is not the word.  I thought I would post pictures of the completed towels though.
Decorative stitching on the bottom edge

The tops, complete with buttons

Novelty 'dress' towel, I do like making these.
The buttonholer was by far the best behaved machine, it took me about 10 minutes to set it all up and do all three buttonholes.  I do love that machine.

Friday 19 February 2016

Singer 12 Sewing Machine


My latest purchase is a birthday present for a family member similarly interested in sewing machines.  I won this machine on ebay (my first foray into the world of bidding) for the sum of $70 but only paid $60 as I had an ebay voucher.  I did not know for certain what the machine was when I bid on it but trusted my memory and instinct that it was a 12 and I was correct.  The listing also said that it was missing its shuttle, which it isn't, I was ever so pleased when I discovered that.
I have limited time to look at it as I have to wait until its intended recipient is out for a while.  However, in the two brief looks at it that I've had I have ascertained that the belt guard is sheered on the front (I have no idea how that is possible without it being severely damaged in some other way.), it is completely seized and I can't get a single screw undone.  I am doing well!  It will now have to wait for another few weeks before I get an opportunity to investigate it again but here are some pictures to be going on with.


Belt guard showing broken section in front

Bobbin winder detached

Underneath

Monday 25 January 2016

White Family Rotary

One of my most recent purchases was a machine that I have wanted for a very long time - ever since I passed up on one in a scrapyard, a White Rotary.  This beautiful machine comes in a lovely cabinet, unfortunately slightly water damaged, with a fantastic mechanism which lifts the machine as the top opens.  I have not yet found the time to work on it, other than removing a large thread lock from the race but I am looking forward to it!

From the back

From the front, unfortunately the word 'White' has rubbed off

The decal on the inside of the pillar

Showing faceplate and tension assembly

Patents are stamped on the uniquely shaped plate.
The latest patent on mine is 1913 so it could be almost 103 years old.  Not bad condition for a machine that has been around that long!

Monday 11 January 2016

How is it possible?


I had a bad feeling about the coming year already, this hasn't helped.............

Wednesday 6 January 2016

Butterick B5920.....

....my new favourite dress!  For the past few years I have made myself a dress in late November to wear to an end of year function.  My previous favourite was the rose pinafore that I made a couple of years ago.  However, I think it could have just been eclipsed by my latest creation.  I was short on time and even shorter on motivation when I started making it but it went together like a dream and fitted wonderfully.  I didn't take any construction images (too much of a hurry) but have some completed images.

 Instead of fussing about with a sheer and probably difficult material (and then having to make a slip as well) I went for a sensible cotton printed quilting material.  It happened to be on clearance when we bought it, fortunately given the price!  I made the belt from a scrap of red poplin I had over and used pretty bright red shank buttons, although you can't see them in the picture.

From the front

From the side. I'm in love with those shoes btw!

Collar detail before buttons added
I used my Singer 66 (not yet posted about here) for the general construction, set into the 206's table so I could use the clutch motor.  However, my 66 is one of the earlier ones and has the earlier presser bar which requires special feet.  As a consequence I did the buttonholes on my industrial buttonholer, the 71-30.

Finally, today is Loretta Young's birthday and I cannot resist a few lovely photographs....
Those sleeves.....